
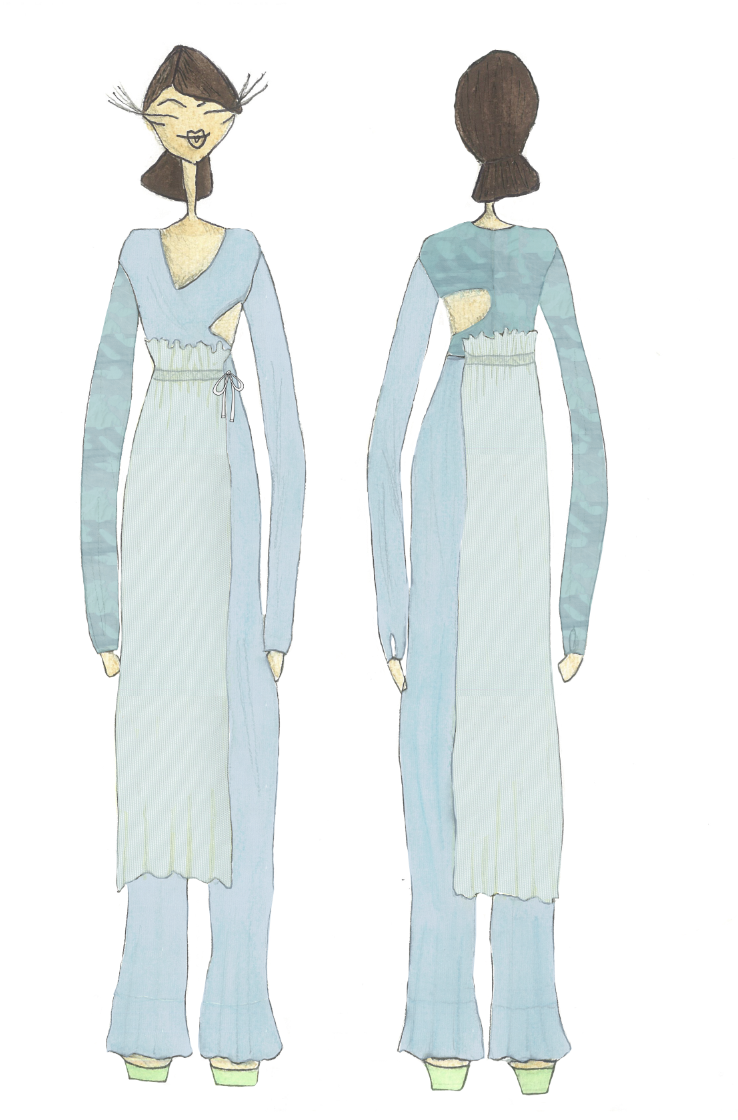
LOOK TWO- Bridal Jumpsuit and Skirt
- emmaburke2701
- Aug 29, 2019
- 4 min read
Updated: Oct 22, 2019
ORIGINAL DESIGN DRAWING AND SPEC

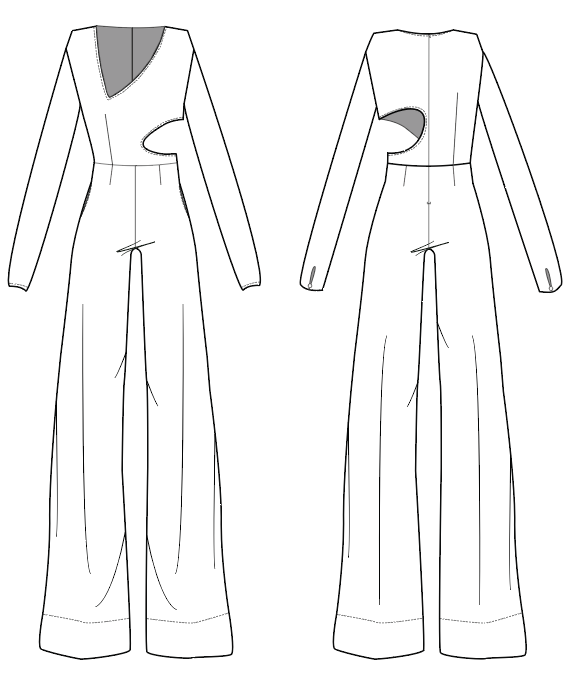

Documentation
Changes to design-
I came to the decision that I didn't want to use contrasting fabrics on my jumpsuit- once I had purchased the main fabric for the jumpsuit it didn't go well with the patterned contrasted fabric I was going to use on the back bodice and one of the sleeves. So I decided against it and just made the jumpsuit out of the main fabric- 100% Silk Crepe de Chine.
After looking at my spec drawing closely there were some slight changes I needed to make before the pattern making process. The hem I no longer wanted wide as this would look bad topstitched on a nice silk fabric- So I changed this to a very tiny hem called a baby-lock hem- I didn't need to add any hem allowance to the patterns other than the usual seam allowance of 1cm. The baby lock hem is down with special applique scissors.
The sleeve was a narrow sleeve with a button keyhole opening- I decided against the keyhole opening and decided on more of a flared sleeve like the pants.
I had also made the sleeves dropped from the shoulder- this however didn't suit the fit of my jumpsuit so I took them back to normal crown.
The pants are actually going to be dartless at the front like the suit trousers and and only have darts at the back.
The bodice will actually have french darts not waist darts.
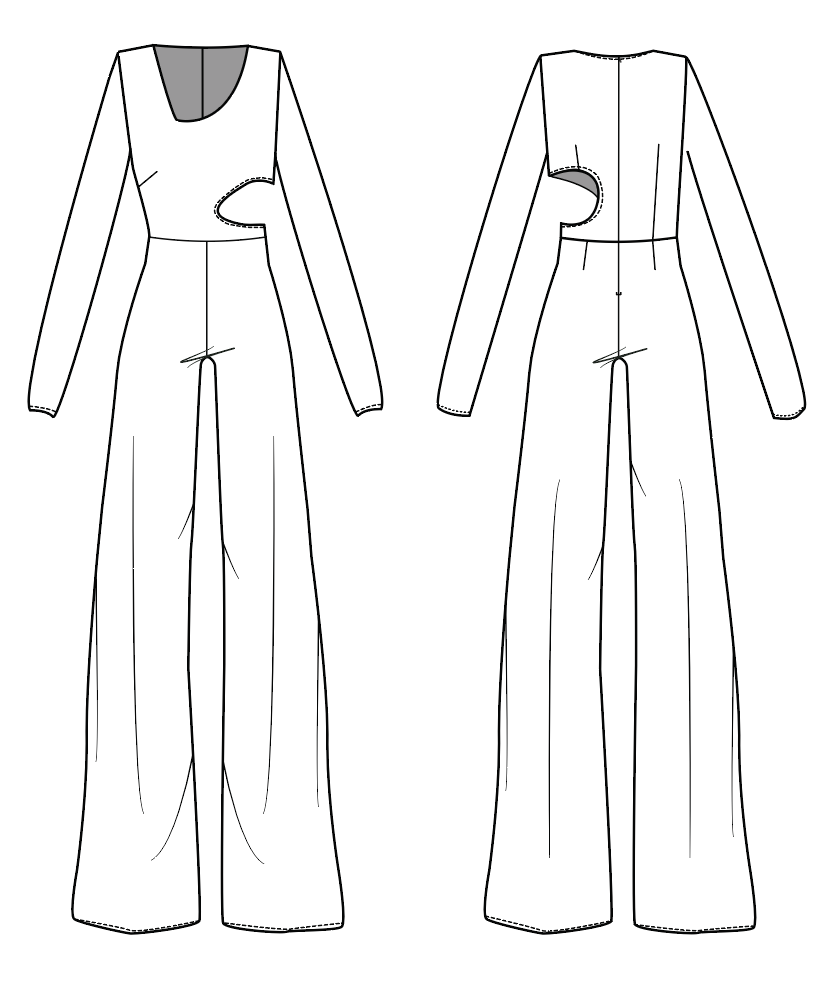
UPDATED JUMPSUIT SPEC

Pattern making Process-
The jumpsuit has been one of my biggest struggles with fit. I used the same pattern as the pants in look one in my jumpsuit and created a separate bodice pattern that will sew to pants to create a jumpsuit. After making up my first toile there were quite a few areas of fit that needed assessing.
First pair of pants...


The pants were far too tight and needed more ease added to the hip area from the top of the inseam pocket to about 10cm below the inseam pockets. I added 1cm to both the front and back pattern in this area, so in total 2cm. I retoiled the pants and attached them to the original bodice, this time without the pockets as it was suggested to me that I should leave them out because they don't sit correctly against the body with the type of fabric and not enough ease to actually be used.


TOILE CRITIQUE..
My 2nd toile of the pants still wasn’t quite right the pants were still far too tight. So more ease needed to be added.- more width was needed to be added to the hip and butt area- due to the fabric choice a lot of ease is needed.
After a more extensive look at my jumpsuit there were a few more areas of change that were needed.
Pockets should be eliminated they aren’t needed and aren’t sitting right
More rise is needed in the pants and bodice- 1cm to bodice and 1cm to top of pants
More ease is needed in the waist- 1cm to side seam of bodice and 1cm to waist of pants.
Changes were needed to be made to the bodice as well-
The darts needed to be shortened as they were right to the bust point. They needed to be shortened but 2.5cm-5cm.
The side seam below cut out need to come in 2.5cm back to ‘0’ at waist.
The cutouts will need to be bound, Front curve needs to be lowered to below the bust.
The neck line needs to be more asymmetric and sit higher up
The Zip is curved on the body instead of straight and this could be because the bodice actually needs more width so hoping that adding width to the bodice and pants will straighten this out.


After making all these adjustments to my pattern I quickly toiled up another jumpsuit just so I could assess the new fit- It was a lot better but still could do with more room added on the hip- so we cut up the side to see how much. The french dart could also afford to be sewn shorter. I didn't need to re toile just had to make the changes on the pattern and start my final.


FINAL JUMPSUIT


There were some difficult areas of construction within the jumpsuit as I told I did not need to line it meant I had to french seam every seam and bind the neck and cut out opening.
I french seamed the armholes which was a new technique for me and had to be done in my bomber jacket too. So I had some practice of this from the bomber jacket toile.
Another new technique was french seaming the crotch seam in the pant. This had to be done by sewing the inner leg seams french seam first and then french seaming the crotch seam. It seemed a lot more daunting than it was.
I also had to do an invisible zip into a french seam
I had done this last year but needed reminding to make sure I was doing it correctly
I tried the jumpsuit on myself and it fit me but needed a good steam. The cut out on the front gaped at the bust- I fused the cut out to try and stop it from stretching when binding the edge but it must have still stretched a little.
I asked what I could do about the gape on the bust and was told I could just use fashion tape to take a little tuck in for the photoshoot or I could take a dart in. Other than that the fit of the jumpsuit was very much improved from all the toiles I made.
MODEL FITTINGs...
The model I tried the jumpsuit on actually had a bigger bust than me and filled out the gape in the bust so it wasn't as noticeable- so it will just be something that I fix for myself after this project.


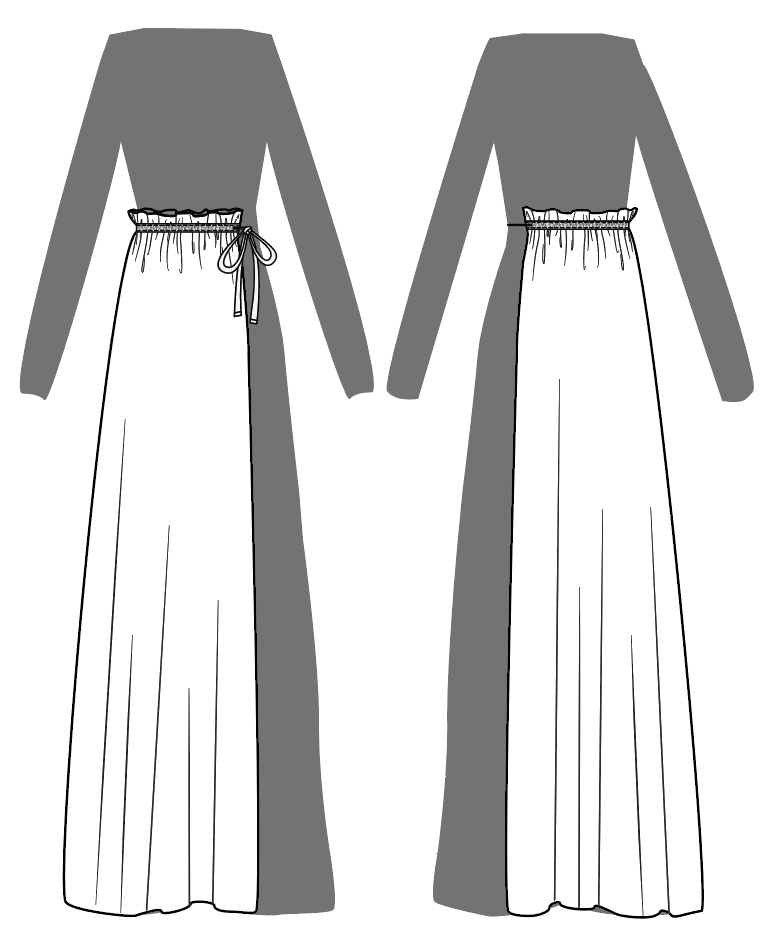
OVERSKIRT:
ORIGINAL OVERSKIRT SPEC:

This was one of the simplest patterns and garments to make. A square of mesh fabric with a paper bag waist turnover and a casing for a tie of fabric to be pulled through and gather up into a half skirt.
The edges will be finished with a 1cm double turn over hem.
I originally designed the skirt to be midi length but after toiling I like the floor length design a lot better and it seemed more elegant so decided to keep it long.


TOILE CRITIQUE..
No bad comments were made about the overskirt, other than it was a good decision to keep it long. The tie will be made from the same fabric as the jumpsuit.
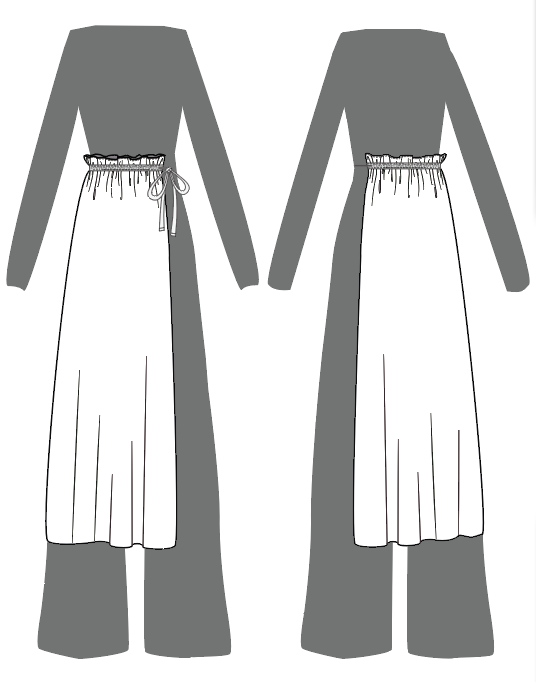
UPDATED OVERSKIRT SPEC:

FINAL OVERSKIRT


Comments