LOOK ONE- Embroidered bridal suit
- emmaburke2701
- Aug 29, 2019
- 8 min read
Updated: Oct 20, 2019
LOOK ONE: JACKET
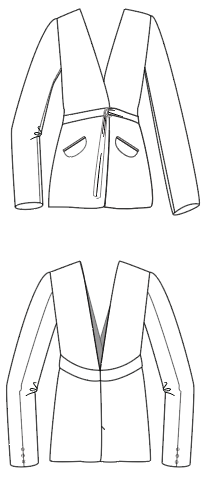
Original Spec and Design drawing:
Pattern-making process
JACKET
Using the women’s size 10 CAD tailored jacket block as my base- I eliminated the collar on the front and the back pleat on the CB. Taking both the front and back pieces to a V opening.
After looking at my design drawing I noticed I hadn't thought about the fit at the front of the jacket and what I was going to do with the darts- So I came to the decision of princess seams and did this by joining the shoulder and fish dart and cutting down either side of them to create two pattern pieces instead of one.
I had to create the pocket pattern pieces and decide on the placement, and make the new facing patterns for the v style jacket. This meant the lining patterns also needed to be made from the outer shell jacket patterns. I have double jett flap pockets on my jacket and I had done a sample of this pocket in advanced apparel so was familiar with the pattern pieces.
Another pattern I had to make was the belt piece extending out from the CB the belt has a curved feature as it wraps around the body.
Patterns include 1cm seam allowances and 6mm seam allowances where needed.
An important aspect of my tailored jacket is the digital embroidery. In order to get this perfect I needed to run some tests of my design. I ran a few tests with different fusings on my fabric to make sure it was going to stitch out how I wanted ( check post on digital embroidery for more in depth testing.) On my toile I tested the most important placement idea for my jacket just to make sure I was happy with it.
Fittings and Feedback
JACKET
I made quite a thorough toile for the jacket as I had to complete a various amount of testings for the digital embroidery. This meant it was very easy to fit because it had facings, shoulder pads, boomerangs, and was lined in the body with facings.
It was a really good fit through the body with the tie closure being a good length and sits well.
The pocket placement worked with the embroidery and the pocket bag a perfect size. The final look will have two pockets and one flap will be embroidered.
The embroidery looked awesome and the placement worked really well with the style of the jacket- on the final it will also feature on a pocket flap and on the left side of the body and right side corner.
Areas that needed work were the shoulder neck points of the jacket they were very pointed and sat away from my neck. This was an easy fix on my pattern as I straightened out the shoulder instead of it being so slanted. Taking the shoulder neck point down 1cm.
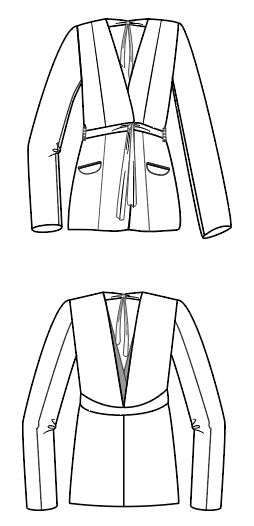
Another area of change that is needed is the back V opening and creating something to keep the jacket in place and not falling off the shoulders. A back neck tie from the shoulder points was suggested and I think this is a good design feature that matches the waist belt and will tie together to keep the jacket stable.
Originally the tailored jacket was going to have a D-ring closure but while toiling I made a belt that tied together and added some belt loops and actually liked this finish better. D-rings wouldn’t finish the jacket off as well as the tie does.
JACKET TOILE CRITIQUE…
The waist tie needs to all be one piece and be separate from the jacket- with an added belt loop on the centre back.
The back facing on the inside needs to be like a ‘v’ neck facing and not extend right to the hem.
The welt pockets need to be positioned a little more towards the side bodies.
As I actually want the jacket to be a wrap over style- I will need to add a 4cm button wrap extension to the front centre pattern.
The hem needs to be turned up 4cm and then attached to lining.
The sleeves need to be longer with a 4cm hem turn up as well.
Things to think about….
Cutting down the size of shoulder pads,
Under-stitching the front and back facings- thinking about the order of construction
Working on the construction of my welt pockets and making sure I am finishing them correctly
Updated design drawing/spec Drawing
Jacket Final Process-
My final process started with me block fusing some of my fabric and taking it to the digital embroidery machine to stitch up. Once this was complete I had to fuse the back and sleeves of the jacket where appropriate and then I could start the process of sewing my jacket together.
OUTER SHELL: Wool Lycra Nylon
LINING: Silk Cotton
Areas of difficulty: Majority of the jacket was familiar to construct after I had completed the toile- I had difficulty sewing the lining with the hem turn-up and attachment to the facing. I had never done a a lining like this but had always wanted to and to learn how to do it. I tried to do it the best I could but there is definitely room for improvement.
IMPROVEMENTS
My sleeves are not the best- they show a little creased and this could be due to me not easing them in correctly.
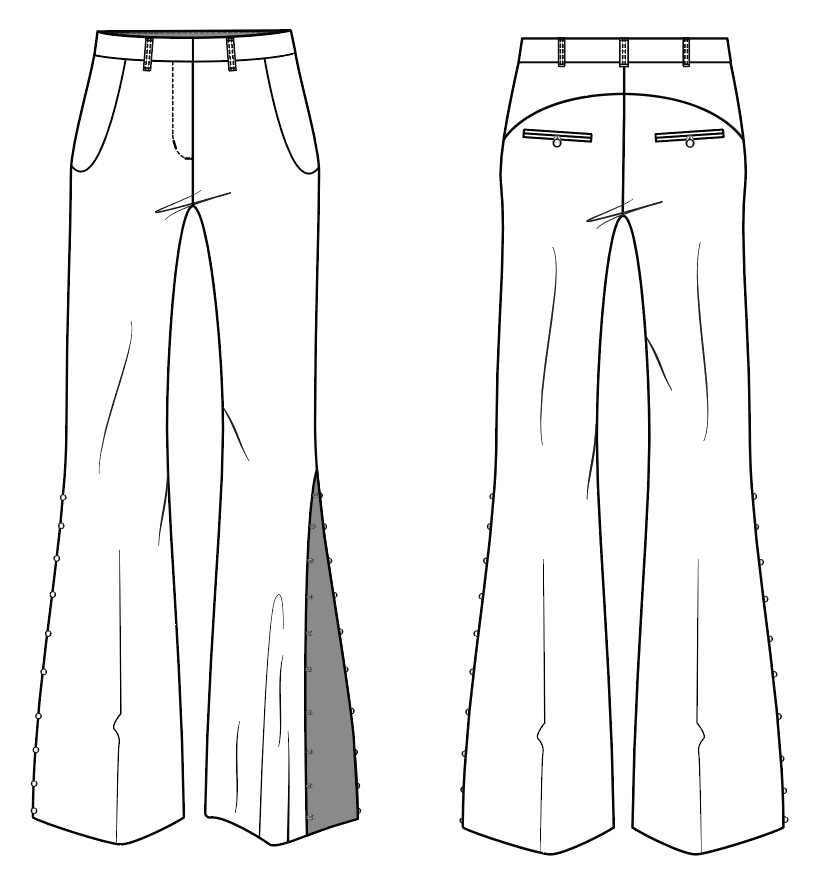
ORIGINAL SUIT PANT SPEC
SUIT PANTS PATTERNMAKING
I have used a block size 10 women’s trouser that Claire lent me as it has a better fitted crotch than the original block. The pants are flared and have a facing on the side seam where they open up with roulette loops and covered buttons. The Facing pattern is essentially like a button wrap and is made by drawing a rectangle to the correct measurements.
I have a back curved yoke feature on the back of the pants- so I did this by closing the back dart- drawing in my design line through the bottom of the dart and tidying up the curves.
I struggled with the curved waistband pattern. I traced it off the front and back trouser placing them side by side and drawing my waistband on- however when sewing the band on it was far too long.
Patterns include 1cm seam allowances
PANTS
I made a very quick fit sample of the pants before adding any of the design features and using similar fabric to my final.
The fit of the trouser was very tight especially around the butt, crotch and hip area
I needed to extend the hip area adding a little more room through the crotch and hip. I started by curving out the hip an extra 1cm (5mm on the front and 5mm on the back)
The waist was good on the front but with the fly added it would be very tight around the crotch and tummy. The back waist didn’t sit tight against the body but this is because I have a sway back.
The flare in the trouser leg was perfect and fit my design.
After making quick adjustments to the pattern and making the pocket patterns I could re toile the pants in a wool lycra just like the final fabric.
This time I made the pants fully with a finished fly opening, waistband, pockets and plackets down the sides with some roulette loops to test this design idea out.
PANTS TOILE CRITIQUE
The pants definitely needed some work, they were a little too tight around the waist, and too tight across the stomach and pockets, which made the pockets not sit flat and roll out and gape.
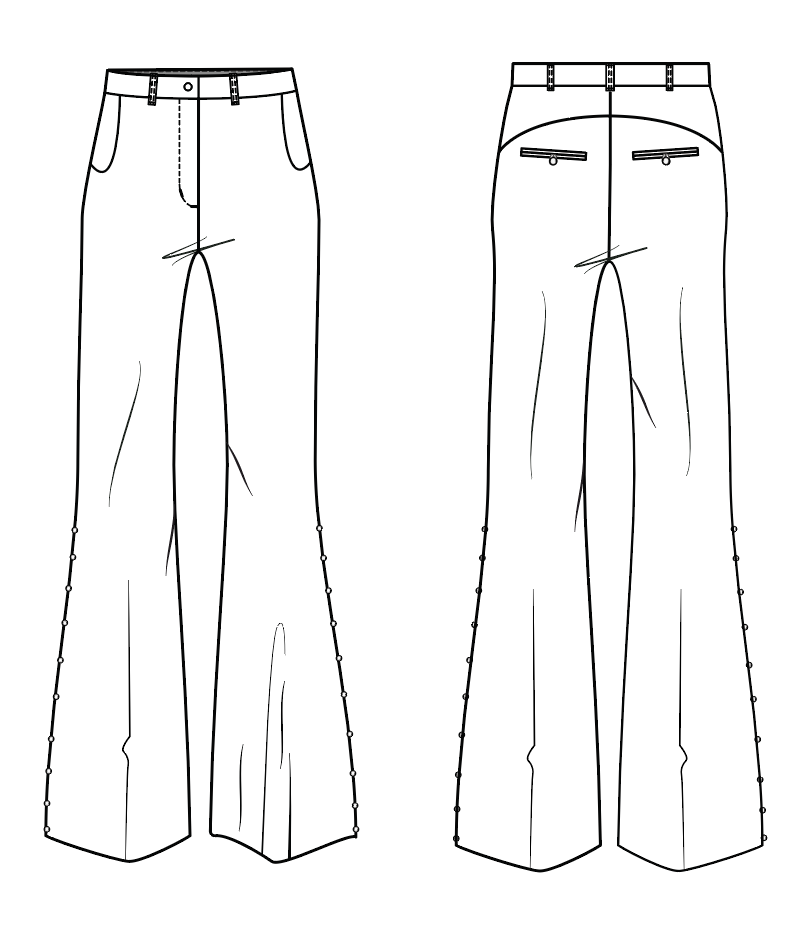
The pockets were too wide and low and need to become more like jean pockets or slash pockets in order to sit better.
The back yoke was too long it needed to be raised as it was sitting unattractively on the butt. Because the yoke was so low it meant the back jett pockets were also too low so these need to be moved up with the yoke.
It was suggested that I think about eliminating the roulette loops as they aren’t seen anywhere else in my looks. All my looks are different from each other as my collection isn't designed to be cohesive. Roulette loops do feature in other areas of my designs but I do agree with eliminating them. I wasn't happy with the finish of adding roulette loops as the side of the pants would have to be topstitched so I have come to the decision of losing the roulette loops and just sewing covered buttons onto the side of the pants as a design feature.
The side of my toile was cut up (shown above in last image) to see how much room was needed to be added within the pant. I added another 1cm to the waist of the pant and another 3cm to the upper hip and thigh of the pant.
FINAL PANTS
Progress pictures of pant construction.
Some areas of difficulty in the construction of the pants was of course the tailored fly- I followed the video on stream so that I could take it slowly and try get it perfect. There were slight areas where I could have done better but I think it was a pretty good outcome for a tailored fly.
Another area of concentration was the back jett pockets. They were slightly different than just the usual double jett pocket as I wanted to incorporate a roulette loop closure to them. This took a while to figure out where and when to attach the roulette loop so that when the pocket turned in the roulette loop sat the correct way. I eventually figured it out and am happy with the result.
I tried the pants on myself and they were definitely better than my toile pants they fit better on the waist and had a little more room through the hip and butt. However the pockets weren't great, even though I reduced the width and length of them I could have afforded to reduce them even further as they were pulling awkwardly still. Also the pocket bag was very small. I then tried them on Kasey my fit model and they sat the same as they did on me.
There was nothing I could do now to fix- but I knew the jacket was long enough to cover the top of the pant in pictures so I wasn't too worried.
I decided to try them on my tutor Claire to see if they are better suited to a different body type.
They fit Claire really well and the pocket didn't pull on the hip at all- Solution is to dress them on a body that as less of a butt and hip.
IMPROVEMENT:
There were definitely areas of improvement needed with my pant but the overall look of them is what I wanted to achieve. Next time I would work more on the fit around the butt and hip area and with the pocket placement so that they would fit my body type better.
I would make the pockets even smaller and a wider shorter pocket bag, so that it can sit better against the body.
Hemming the pants was quite a nightmare, I wanted to have a blind hem and when I used the blind hemmer it didn't work well with my fabric as it curled it up and showed up completely on the right side of the fabric- Which it is not supposed to do!!!
So I came to the decision that I will hand blind hem the pants to try and achieve a more blind look- It was better than the blind hemmer but still could have been improved.
BODYSUIT
The bodysuit was quite a simple piece to pattern make as it is not too different from the block. Tracing off the small bodysuit equivalent to a size 10- The only changes I need to make is a rounder neckline and a curved loop opening on centre back. I want the body suit to have a dome closure on the crotch so it’s easier to get on and off. This is an adjustment I need to make adding allowance to the front crotch and extending the crotch length on the back.
Patterns include a 6mm seam allowance as its a knit
BODYSUIT PATTERN MAKING
The bodysuit was pretty straight forward and very close to the block pattern.
The changes I have made are to the centre back- adding a button opening with a curved back opening.
Adding a dome closure opening at the crotch.
TOILE CRITIQUE…
The fit of the body suit was really good but I needed to reassess the dome closure opening in the crotch. The back crotch was too short and was awkward to reach and close shut with the front.
Solution…
This was an easy fix and just required me to add length to the back crotch so that it could reach around the front.
BODY SUIT FINAL
This was fairly simple garment to construct- I made the back keyhole larger for the final and I extended the back crotch so that it nicely came round to the front to dome close.
I put stabilising tape in the shoulders to stop stretch and I bought clear rubber to rubber-rize the leg seams- but after trying this I found that an overlocked edge in the inside looked messy and sat uncomfortably against the body. So I double turned the legs, neck and sleeve hem and plain-stitched them.













Comments