
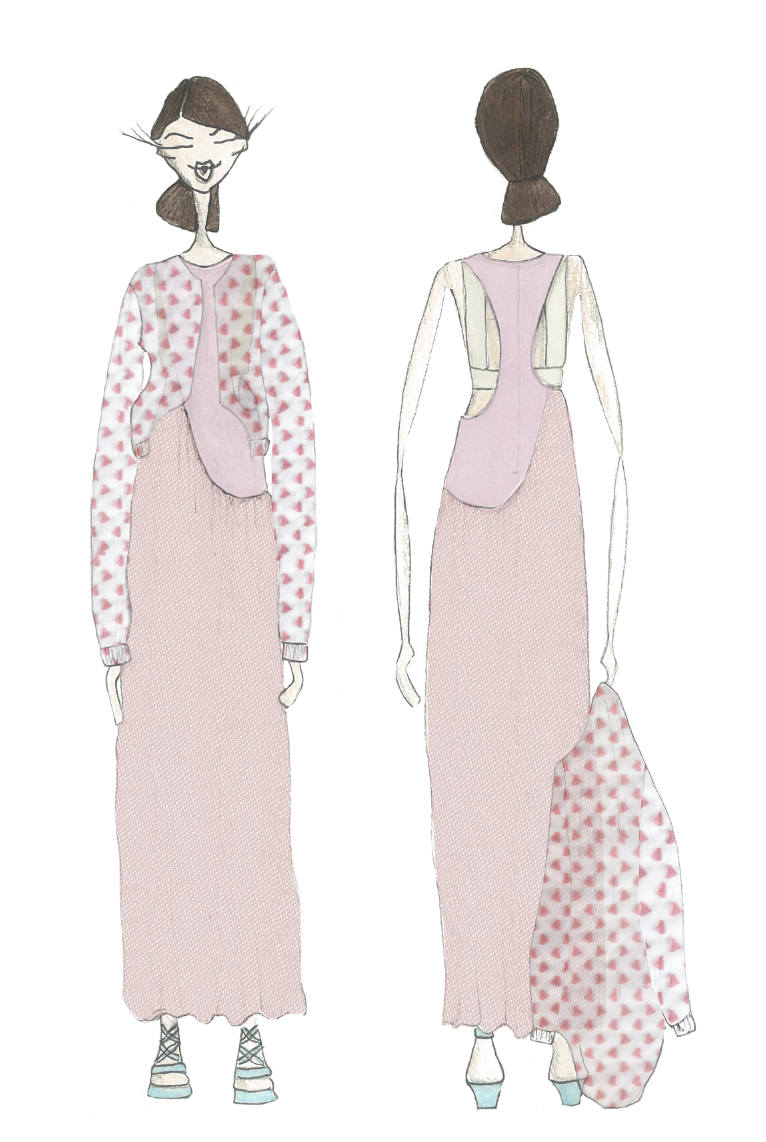
LOOK THREE- Bridal Dress and Bomber
- emmaburke2701
- Aug 29, 2019
- 10 min read
Updated: Oct 19, 2019
Pattern/Toile documentation of changes
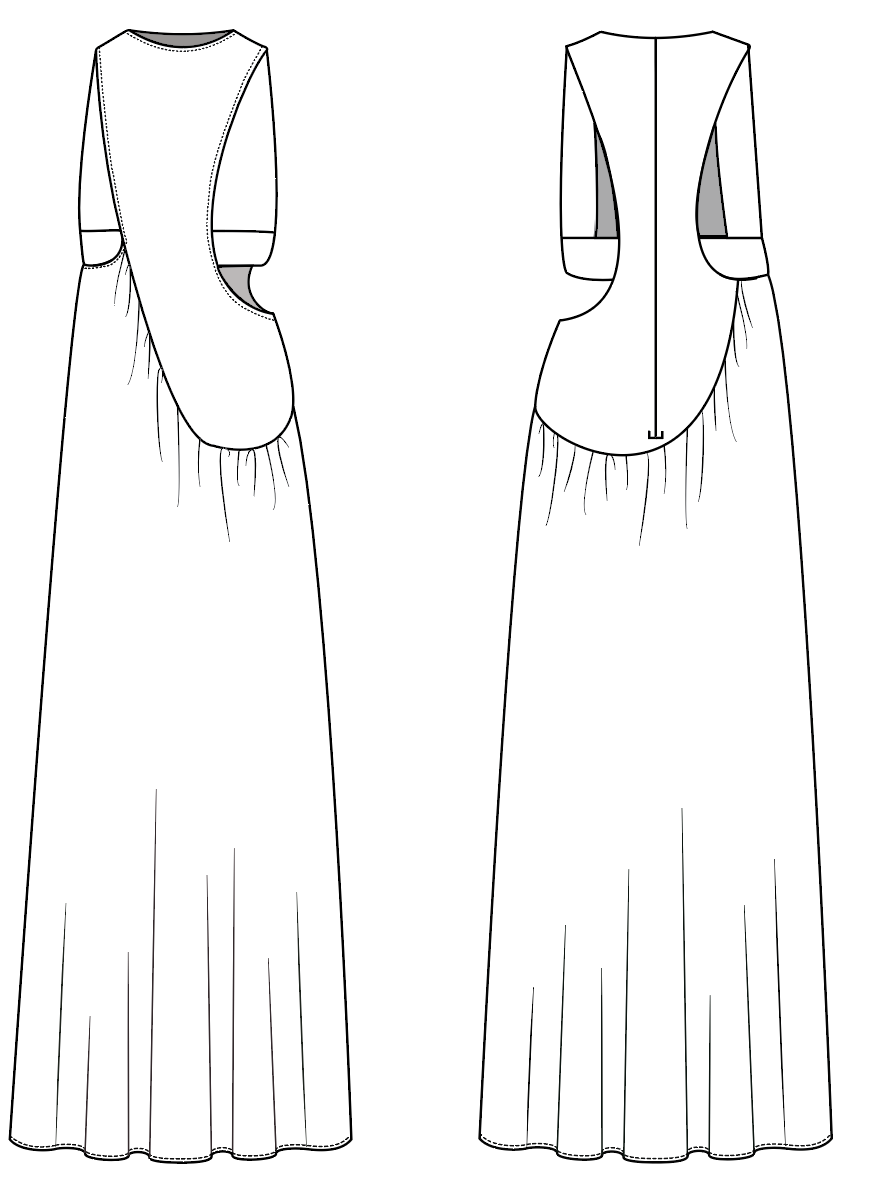
Original Bomber spec and design drawing


1. Bomber Jacket- My bomber jacket is designed to be see-through and includes an exposed metal zipper. I attempted to make my toile jacket fully finished and wearable as I want to have this as an outfit for the end of year show.
I created my bomber pattern from the blouse block- I started by figuring out the finished length I want my jacket to sit at so I could order the right size zip- this came to 40cm. Before I sewed my final toile I made up a quick outer shell mock-up just because I knew I wanted my bomber toile to be wearable.


The quick mock up worked well so I moved onto cutting my final toile out.
I was really happy with the outcome of my bomber jacket but there were some areas of difficulty that require more thought and some changes suggested to be made.
Instead of bagging out the lining in my jacket I treated both layers of fabric as one and finished all seams as french seams. This however caused trouble with the neck facing as it couldn't be joined into the lining so just had to sit free- I finished it off with a bound edge but wasn’t happy with how it sat. It also meant the zipper tape was exposed on the inside so I bound those edges too.
A new skill I learnt was sewing a french seam into an armhole- it sounded like it was going to be challenge so I researched the correct method to do this and got some advice from the tutors as well.
Main thing to think about was the order of construction- I sewed the sleeve seam seam first with a french seam and then just like you would when setting in a normal sleeve I pinned sleeve head into the bombers armhole- However placing wrong sides together first with a 5mm seam. I then trimmed this seam down to 3mm like all french seams and sewed the sleeve head right sides together at 5mm- sewing the sleeve right sides together to finished the french seam was very easy because the sleeve was already set in.
RESULT- I was happy with the outcome and will use this method and technique in my jumpsuit as well.
Changes to design:
FLAP POCKET-
I noticed I didn't design pockets for my bomber jacket- but this was definitely something that I wanted to have. I decided to have one double jett pocket with a flap on the left side of the jacket as the right side has a cut out. The jett pocket was semi difficult as it was all sheer material so all seams and pocket bags were going to be visible from the outside. I constructed the pocket just on the first layer of fabric so that I could hide it when placing the lining as the second layer. I also finished the pocket bag off with a bound edge to match other areas of the jacket. I was happy with the outcome of the pocket and thought it looked neat and tidy.
The cut out on the right side of the bomber was finished with a bound edge- This fabric was very had to bind with, I used the binding machine and the fabric seemed to slip in some areas. SOLUTION- I will need to bind without the machine and construct it myself, through sewing and pressing. This will allow me to be able to bind the complete circle in one go instead of sewing the back and front separately and joining at the side seams.
HEM:
I changed the hem on the bomber jacket to less of a dropped curve hem to just a slight curve. This was going to work better with the elastic finish and how it sat on the body.
UPDATED SPEC FOR BOMBER


BOMBER TOILE CRITIQUE-
It was suggested that I should actually bag out the jacket lining instead of treating the two fabrics as one layer, this means the facing would be joined to the lining. It would also bag out the zipper tape so would be a neater finish. I will however still leave the hem edges raw and treat the hem as one layer of fabric and just fold over and add the elastic. This is an easy fix no changes to pattern needing to be made, except to create lining patterns that factor the neck facing and where it will attach.
FINAL BOMBER JACKET
My final bomber jacket was a garment I had decided I wanted to embellish- I had visions of learning tambour beading after I had purchased myself a tambour hook- but after some research through books and watching youtube videos I couldn't get the hang of it and it didn't work on my fabric. It is still a skill I would like to gain some expertise in once I have finished.
Instead I got some books out of the library about hand beading and different stitch types- I decided I will just bead the jacket this way and I bought an embroidery hoop with with a stand to make things easier. I sewed a lot of beads on one at a time and others about 3 at a time securing with a back stitch.


When I started I noticed it was taking ages so came to the decision that I will just bead the back of the jacket, I didn't really come up with a design for my embellishment I instead used the design on the fabric to aid my beading and just do a random scatter of beads within the pink triangles.


Bagging the lining out was actually easier than I thought it was going to be- and I agree it did give the jacket a much neater finish than my toile. It meant I could sew the facing to the lining so that it wasn't sitting inside the jacket attached to nothing. The zipper finish was also better but I still found that I had to bind the finished edge of the zipper tape as both the jacket layer are sheer.
IMPROVEMENTS:
I sewed the the facing onto the jacket with a french seam- which I think worked well but could have worked better and been less bulky if I just did a single seam and trimmed the excess off.
I sewed the lining to the facing with just a normal 1cm seam and trimmed the excess off but this wasn't the best idea because you can see the seam through the sheer materials- I should have bound this edge instead of trimming off the excess.
I wasn't overly happy with my elastic cuff finishings- I could have taken more time to make sure everything was the same lengths and didn't slip or stretch in construction- because there are some areas where the lining sits a little short and tighter than the outside of the bomber.


Final beading
2. Dress-
Original Dress spec

I made a pattern for my initial design of the dress- which had a gathered skirt and a scoop bodice- After toiling my pattern there were many changes that needed to be made- I did not slash and spread the gathered skirt pattern completely evenly so it was proving very difficult to fit to the bodice and sit nicely in the hip area, there was too much fabric left at the top of curve (Figures 5 and 6) , I also used the wrong toiling fabric for the bodice of the dress- as it had a lot more stretch in it then my final fabric and it had stretched as I was sewing so was far too big in areas it needed to be fitted. (figure 7.)
Overall I desperately needed help with the whole design of my dress.


SOLUTION:
I needed some advice on how to fix my dress and make it better. After looking at my spec drawing again I had originally designed the dress to have a separate under top that attached at the shoulders or neck- but when it came to pattern making and toiling I was getting confused so made the bodice all one with attached side panels. This would still work if I used a better toiling fabric but I came to the decision that I will make the a completely separate under top to wear under the dress bodice and will eliminate the side ties on the dress bodice and incorporate them into the under top.
It was suggested that creating a gathered skirt in silk is a nightmare so my design would work a lot better if it was cut on the bias- the bodice of the dress should also be cut on the bias but will need to be fused with fusing tape to stop the fabric from stretching.
I used a pattern for a bias cut dress I made in advanced apparel in semester one (pictured below), to get the bottom of the dress right for a bis cut. I traced where I would want the bodice to finish- curving from the waist point to the hip- I also changed the direction of the curve so it was curving to the right not the left. I then used the same pattern from the first toile for the bodice just eliminated the side body attachments and cut the fabric on the bias.


I made up a quick sample of it to show at critique and get some advice going forward- Length would need to be added for the actual design.


The bias cut was way more flattering and gave a cleaner look to the design of the dress, the lecturers were happy with the design. The bias design allowed it to sit much better on the body and looked more elegant than the gathers.


I tried the toile on myself and noticed the bodice of the dress gaped out from the body on the outside curve and the bodice was falling on the shoulder towards the front of the body. I didn't know if this was just my body or if it was the dress itself- So I tried it on another body (figure 5 and 6.) The same thing happened so that means there is something wrong with my pattern.
I went back to my pattern master- which was set up from the torso block and re did the front and back patterns making sure the shoulders were even etc. I placed my bias skirt pattern onto the master to trace the fit and make sure the bodice and skirt were a good fit together. I also added some room into the hip and thigh area as it sat quite snug on my hip area. Due to fabric widths I can’t make a full floor length bias dress without adding a diagonal panel to separate the skirt lengths up. I created this diagonal panel using the same curve style that attaches the bodice to the skirt.
Design changes:
In my original design I had a zip closure on the back of the dress- I inserted a zipper into my toile to test the fit of the dress- but I didn't fuse the zipper opening and when I sewed the zipper in the fabric stretched a-lot and started to roll over at the top and not sit against the body- This could be fixed in my final by fusing this area- but instead I actually decided that a back key hole opening would be much nicer and more fitting with my design.
The dress was now ready to make the final.
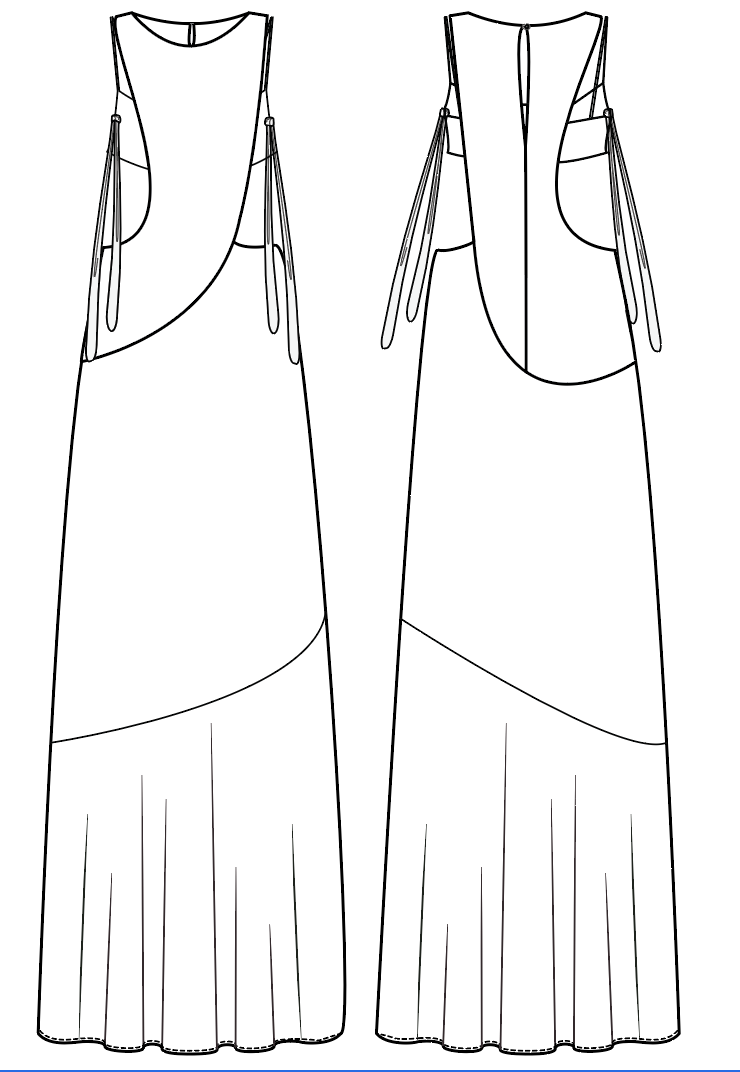
UPDATED SPEC WITH NEW UNDER TOP DESIGN


I had to bag out the lining on the bodice of the dress like an all in one facing- this meant sewing both the outer layer and the lining together matching notches and leaving the shoulders open. Once this was done I needed to pull the front shoulder through the back shoulder and sew the outer layer shoulder seam, then reaching into the bodice again to find the lining shoulders and sewing them together. To finish it off nicely the last thing to do was reach back up and close the two holes on the neck edge and arm hole edge. Finish shoulder pictured above.


When I had attached the skirt I tried on the dress for fit- it was quite tight across my stomach and hips so pulled a little on the bodice curve attaching to the skirt. It will fit a body with less of a hip so this is who I will dress it on.
The bodice is a big improvement from the toile and doesn't fall on the shoulder anymore. The gape on the outside curve of the bodice is also significantly better.
IMPROVEMENTS:
I worked so hard to make sure the fabric would stretch when I was constructing as I experienced this in the toile making- I was told to fuse all edges on my bias cut pieces - especially ones that were sewing to other bias edges or even joining to straight grain edges.
I did this with silk fusing and cutting it into 1cm wide strips. Even though I did this on the skirt- the joining seam of panels on the skirt still went wavy. I think this is because of the fabric choice I had to sew the outer layer of the skirt with paper because otherwise the fabric would gather in the machine- I think the tearing off of the paper would have caused the fabric to stretch.
Under top- I decided a separate under top was going to solve my problems rather than trying to join the dress to a bodice underneath. So I needed to design a new bodice to sit under the dress.
I thought that a simple cami design would be a good top to wear underneath the dress as the simple design would compliment the dress. Having the cami have ties on the side would be a nice feature as the sides of the dress are open so would reveal the ties. I made my pattern again from the bias cut dress I had made, just changing the neckline from a cowl to curve neck with spaghetti straps. I quickly mocked up the sample to see how it would work with the side ties.
After sewing up my first toile I have found some things that need to change and figured out a better order to construction.
Things that went wrong..
As the top was on the bias the front sides seemed to stretch when I was bagging them out-which causes the hem to go a bit wavy. I will fix this by using fusing tape in these areas to avoid the stretch. I made the straps from binding the neck and armholes and extending the binding to straps- I did the binding using the machine but again will have to do it manually in order to get a neat finished edge.
I found that having a tie in the centre of the side bodies wasn't working and I would need one at the top and bottom of the side so that the bodice would sit nicely against the body.


Solutions...
A considered design change is to have grown on ties on either side of the front and back, which if I leave the ends of each tie open I just just pull the garment through to the right side when bagging it out- and finish the edges with a slip stitch.
All I will need to do is add a piece that extends from the front and back patterns curving from the side seams into ties. I am going to make the ties super long. The base of the top will be cut on the bias and the ties will be cut on the straight grain so when sewing these seams together I will use fusing tape to stop the stretch.
I made the pattern for this top from the same dress I made the skirt of the dress from- but this time using the top half of the pattern. I then created a tie piece that was going to sew to the front side seam and another tie sewing to the back side seam- It a funnel shape pattern that curved down from bodice side seam width to about 3cm wide.
I forgot to take images of this look when I was making it- that is because it was working out so well and better than I expected that I just keep working on it.
FINAL PICS OF DRESS, UNDER TOP and BOMBER


Comments